Hole Knight: Silksong‘s Final Choose boss battle is the capstone problem of Act 1 and one of many recreation’s hardest fights to that time, assuming you are following the standard Silksong walkthrough. That is not even making an allowance for the prolonged runback that takes you thru one of many Blasted Steps’ harder impediment programs, too.
Our Silksong Final Choose information breaks down the best way to deal with the runback, lists the Final Choose’s strikes and counters, and presents some recommendation on how finest to prep forward of the battle. We additionally clarify the best way to skip The Final Choose by taking the Sinner’s Street route. When you’re undecided the place that area is, head over to our Silksong interactive map to get your bearings.
Final Choose location in Hole Knight: Silksong

The Final Choose is on the Blasted Steps’ japanese finish, simply exterior the Grand Gate, and it is unattainable to overlook them because the in-game map marks their location with a foremost quest goal icon. Until you’re taking the alternate path to the Citadel (which we’ll talk about later), there’s just one strategy to method Final Choose — ascend the Blasted Steps. On the prime, head left and activate the Bellway and bench within the subsequent room. This might be your runback level.
The Final Choose runback is among the most difficult in Silksong up thus far. It takes you throughout a number of stretches of sand crammed with sandcarvers, slender areas with conchflies whose projectiles richochet off the flooring and ceilings, and open areas the place judges wait to bash you on the pinnacle. Your first intuition is likely to be to hurry by means of and attain the boss. Do not. It is a lot simpler in the long term in case you full the runback a number of occasions to get the texture of it and learn to make it by means of quicker.
It is attainable to clear all the room and attain the Final Choose with out preventing a single enemy. Sprint and bounce off the platform the place the primary conchfly seems earlier than it launches an assault. The decide on the platform above you is inessential, because you get nothing however some rosary beads for defeating them, so ignore them and glide to the platform in your proper. Pogo throughout the bells — in case you’re utilizing the Hunter’s Crest, activate the Drifter’s Cloak after bouncing off the bell to provide your self some house to manage your momentum for the subsequent diagonal bounce.
Use Cling Grip to climb the wall, and ignore the conchfly that pops out from above you. Pogo off the decide’s head to get behind them with out having to battle, then do a dashing bounce to achieve the subsequent platform. Pogo off the bell — or off the conchfly first, if it’s important to — after which the subsequent platform is freed from enemies and obstacles. There’s one other pogo problem on the opposite facet, however you possibly can glide over it after which, on the final minute, sprint to achieve the wall and climb up it. When you’re not comfy with that, glide to the final bell, then bounce off it to achieve the wall.
The final stretch is freed from enemies. The decide is only a husk, and you’ll pogo off the bells, cling to the wall, then pogo off the upper bells to achieve the world’s finish.
If that no-combat technique would not give you the results you want, simply know that you could, no less than, skip the judges on this room, which additionally cuts down on the time it takes to achieve the Final Choose once more.
Final Choose’s moveset
The Final Choose battle has two phases, and the Choose’s strikes change throughout the battle’s second portion. The way in which they’re telegraphed stays largely the identical, however the strikes have totally different results that require totally different evasion ways.
First section strikes
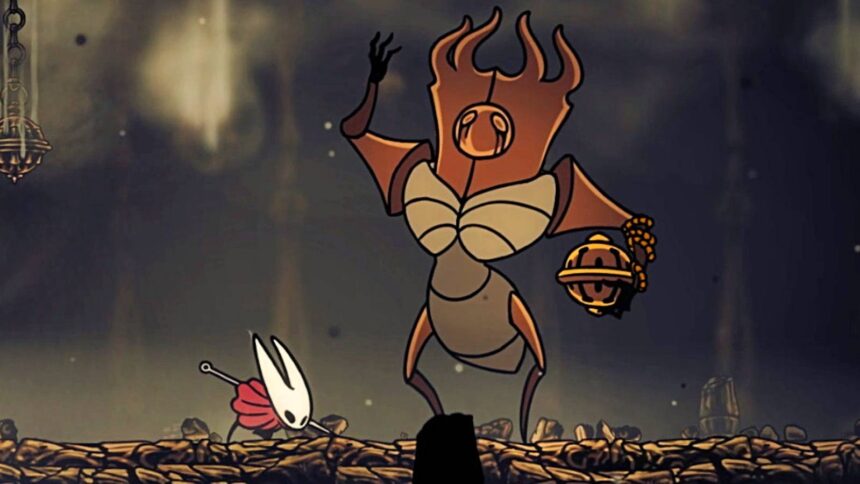
Final Choose has three strikes on this first section. Studying the animations that sign which transfer they’re about to make use of is crucial, as recognizing the distinction between the Choose hoisting the censer (the bell-shaped, incense-burning factor the boss carries) to spin it or pulling it again to throw is rather more vital on your evasion technique than it sounds. Nevertheless, being affected person is simply as vital. It is a battle you may win by being cautious and considered in your assaults — not by dashing in and attempting to deal as a lot injury as attainable.
- Leaping smash: Final Choose jumps into the air and slams their censer on the bottom. Whereas the transfer’s vary is proscribed on this first section, the most secure strategy to dodge that is by dashing underneath them to the opposite facet. For instance, in the event that they’re in your left once they bounce, sprint to the left to keep away from getting caught by the slam. The second or two after Final Choose lands is the perfect window of alternative to assault, and you may get in two or three hits earlier than they wind up for an additional assault.
- Censer swing: Final Choose holds the censer up and spins it, then whirls it in a large circle that catches you in case you get too shut. Once you see the preliminary spin, sprint away to security. If the Choose makes use of this transfer once you’re close to the sting of the world, it is mainly unattainable to flee in time, so attempt staying away from the partitions as usually as attainable. The inform that this is not going to be the censer throw transfer is that Final Choose’s different hand is pointing upward.
- Censer throw: Final Choose pulls their hand again and tosses the censer bell out. It damages you if it hits you, but in addition if it touches you when the Choose pulls it again in. Sprint past its attain to keep away from it, and in case you’re on the fringe of the world, use wall cling to climb out of its attain. You’ll be able to inform this would possibly not be the censer swing transfer by noticing the Final Choose’s different hand is dealing with inward.
It is attainable to sprint in and assault proper after Final Choose finishes both censer assault, although you should pay cautious consideration to what they’re doing with their fingers so you possibly can evade no matter assault is coming subsequent. When you do assault, simply go in for one hit earlier than retreating.
Second section strikes
After you land sufficient hits on Final Choose, they let loose a roar, add fireplace to their present abilities, and use a brand new assault. The section kicks off with the censer swing’s new variation, and from then on, Final Choose makes use of a mixture of fire-infused assaults and, often, a few of the first section’s strikes. Like with the primary section, your finest guess is to take it sluggish, and be taught to acknowledge which transfer Final Choose goes to make use of based mostly on the animations that precede the assault.
- Holy smokes: Final Choose swings the censer in a large circle and creates rings of fireside that fan out throughout the world. Strains of smoke mark the place the fireplace will seem earlier than it ignites, so be sure you’re standing in a secure spot. The hearth strikes slowly earlier than it dissipates, which suggests you may want to maneuver with the secure house to keep away from taking injury. The animation is identical because the censer swing transfer from the primary section.
- Flame cost: Final Choose crouches, then costs throughout the world and causes pillars of fireside to erupt behind them. Soar to keep away from the cost assault, and attempt to land in an area between the pillars. Smoke will present the place they’ll erupt earlier than the fireplace really seems, so you may have a few second to maneuver to security. When you’re feeling courageous, you possibly can purpose to land between the Choose and the primary pillar, which supplies you an opportunity to land some hits. Alternatively, in case you land on the opposite facet of the Choose, you possibly can keep away from the pillars totally and simply assault till the boss strikes once more.
- Flaming smash: Final Choose leaps into the air and slams down, the identical as within the first section. This time, nonetheless, they create a wave of flame that rushes outward from the affect web site and covers all the floor. Dodge the preliminary slam as traditional, then bounce and use the Drifter’s Cloak hover to keep away from the flame. Use the second after touchdown to assault Final Choose.
- Flaming censer throw: Final Choose ignites their censer, then throws it, the identical as within the first section. The censer creates a small explosion a second after touchdown, so stay a couple of steps away to maintain from taking injury.
After dealing sufficient injury throughout the second section, Final Choose roars once more and whirls the flaming censer for for much longer, sending out three waves of fireside rings. That is the one time in our expertise that they’ve executed this, nonetheless, and it is not the beginning of a 3rd section.

After you land the ultimate hit on Final Choose, they begin shaking and muttering whereas a cloud of smoke emanates from them. Transfer past the smoke as shortly as attainable, because the Final Choose will explode violently after a couple of seconds.
Methods to prep for Final Choose

Timing and persistence is likely to be crucial a part of making it by means of the Final Choose battle, however there are different issues you are able to do to provide your self a greater likelihood. One in every of them is utilizing the correct crest. We suggest the enhanced Hunter’s Crest or the Reaper’s Crest for this battle.
You’ll be able to improve the Hunter’s Crest by utilizing the Needolin in Moss Grotto to unlock the Weaver door and entry Weavenest Alta. The improved model helps you to deal additional injury after you strike a foe sufficient occasions, which helps you to whittle down the Final Choose only a bit quicker. The Reaper’s Crest is your reward for clearing the Reaper’s Chapel in Greymoor, simply above the world the place you battle Moorwing. This crest generates extra silk orbs after you heal, which is useful for sustaining a gentle move of therapeutic or silk abilities throughout the battle.
When you’re combating the Final Choose runback’s pogo challenges, persist with the Reaper’s Crest. Its downward strike makes it simpler to bounce over the sands.
Your offensive software selection would not matter terribly for this battle, although in case you do use instruments, ensure that they cowl a good distance and have a number of makes use of. The Straight Pin and Longpin are the best ones to make use of with out placing your self at risk, although be sure you do not use them when Final Choose is throwing the censer round, because it blocks incoming assaults.
We additionally suggest finishing “The Alchemist’s Want” within the Wormways area, which rewards you with the Plasmium Phial. This crimson software helps you to inject Hornet with plasmium 3 times, with every injection granting her a short lived masks. You probably have six masks already — which we suggest you do earlier than this battle, although it is not important — essentially the most environment friendly means to make use of the phial is to make use of one injection whereas at full well being, so Hornet has seven masks. Nearly all of the Final Choose’s assaults deal two masks of injury, so it’d take 4 hits to defeat Hornet this fashion, as an alternative of three.
For blue instruments, you may wish to equip the Magma Bell, which you should purchase from the Forge Daughter in Deep Docks, to cut back Final Choose’s fireplace injury. Evading is preferable, however no less than this fashion, you will not take as a lot injury in case you make a mistake.
Lastly, it is a good suggestion to document footage of your Final Choose runs in case you can. The choice to be taught the boss’ assaults with out attempting to not be killed by them makes issues a lot simpler.
Methods to skip the Final Choose
If all of that is simply an excessive amount of, you possibly can nonetheless enter the Citadel by taking one other route, although it is not a simple route. The trail takes you thru Sinner’s Street, The Mist, and the Exhaust Organ. This path takes you thru loads of obstacles, together with a stretch of fog it’s important to use the Needolin to get by means of, and makes you defeat one other boss, Phantom. Regardless of being difficult, Phantom is not fairly as overwhelming as Final Choose. After you defeat Phantom, head up the elevator into the Underworks and proceed alongside the trail to enter the Grand Bellway Station within the Choral Chamber.
When you do take both path into the Citadel, Final Choose will nonetheless be on the finish of the Blasted Steps area so that you can problem later.
Final Choose rewards
When you rely satisfaction for defeating a tricky boss as a reward, you get that. If not, the one factor Silksong offers you for this battle is an achievement (Choose) and unfettered entry to the Citadel.
On the lookout for extra Silksong assist? Take a look at our important newbie suggestions and prime rosary bead farming areas in case you’re simply getting began, and in case you’re working up towards a couple of locked doorways, our easy key areas information is the one for you.
Whilst you’re exploring and finishing quests just like the “Ceremony of the Pollip” want or “Silver Bells” request, ensure that to spend a while progressing the principle story as nicely, as you may get some upgrades that make battles simpler. After “The Threadspun City” quest, for example, you possibly can improve your needle to deal extra injury.